
How to Create and Modify Forms and Review Results
Webforms are forms you can create without using any HTML. You can select different field elements, create surveys, and validate the results of each field. Submissions to each form are saved, and results can be downloaded for analysis in Excel.
The form and the webform are two different entities. The form refers to the page holding the form; the webform refers to the form itself.
Webform creation is limited to webmasters and editors (See Roles in WebCMS).
- Create the Form Content
- Create the Webform
- Editing the Content and Form Fields
- Customize the Functionality of the Form
- Emails
- Attaching Documents to a Form
- Tokens
- Reviewing the Results
- Download the Results
- Sending Form Data to Other Databases
Create the Form Content
- Under the "Content" tab In your web area Group Dashboard
- Click "Add New Content"
- Select "Form" to open the page that holds the webform (not the actual form itself)
- Add your title, content, and required metadata
- Save your page
- You will be in view mode after you save your page
Create the Webform
- In view mode, click "Edit" to re-open the editor
- Scroll to below the body section
- Click on the title of your form under the "Webform" label
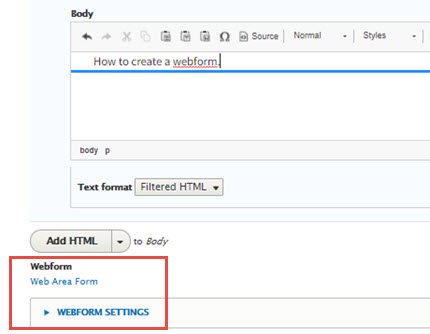
- This will open the Webform in a new tab in the browser
- You will see a series of tabs in the Webform window:
- View, Results, Build, Settings, References appear in the top row
- The tabs in the second row will change depending which tab is selected in the first row
- When the webform is opened, the Build tab opens by default

- To add form elements, click "+ Add Element" to open the "Select an element" dialog box

- Find the element type to use and click "Add Element"
- You can find an element by typing the element name in the Filter field at the top
- For a list of elements, see Form Field Elements
- For example:
- Select "Text field" to open the text field properties
- Fill out any required fields, like title, denoted with the red asterisk
- Optional fields enhance the form element, like description, help, more. You can also set various parameters for the field, like min or max lengths (may not apply to all form elements)
- If you want the field to be required, scroll to the bottom of the Element Settings window and check the "Required" box.
- NOTE: On the web area's Contact Us, do not make the name or email address fields on the form required elements. Pages must allow for anonymous comments.

- Click Save
- If you click "Save + Add element" the element will be saved and you'll be launched into adding a new one
- Once saved, the new text field will appear on the Web Forms Elements page
- When you are finished adding your elements, click the "Save Elements" button at the bottom of the page
- Click the "View" tab to view your webform.
- Note that this is not the form page; it is just the webform. That's why, when viewing this webform, you will not see the body text you added earlier.
- To get back to editing the webform after viewing it, click the back button.
Editing the Content and Form Fields
The form page and webform are on two separate tabs in the browser (the webform was opened in a new tab). NOTE: You cannot Clone a webform.
Edit the Content
You want to make updates to the form page only, and not the webform. Once the updates are complete, you will need to publish the page.
- Navigate to the original tab to edit your form page; it should still be in the edit screen
- Add any text you need on your form page
- Save it
Edit, Move, and Delete the Form Fields
You have created your form elements and now you want to edit them. Once you make updates to the webform, clicking the the "Save Elements" button will automatically update the form on the published page.
- Go into the Build | Elements window on the form
- Select which title you want to change
- Click the "Edit" button to open the element window
- Make your updates, scroll to the bottom, and Save
- Then, in the Build | Elements window, click the "Save Elements" button

- To move the fields around, simply hold the "plus" symbol with your mouse and move it up or down
- To delete a field, highlight the field you want to delete, and select "Delete" in the Operations column dropdown
- You can also duplicate a field by selecting "Duplicate" in the Operations dropdown
- Remember! When you are finished making any updates to the form fields, click "Save Elements"
Customize the Functionality of the Form

These examples show how to customize a simple form available in WebCMS. For assistance in building complex forms and conditionals that are out-of-scope for WebCMS, contact Web Design Services.
In each form element, several options are available to customize its functionality.
Element Dialogue Window
Clicking on an Element's "Edit" button opens a dialogue window. In the example to the right, you will see "Edit Name Element" with "Name" being the title of the element, you will see several options to work with: Form components, Conditions, Advanced, Form Display, Form Validation.
If you want the field to be required, scroll to the bottom of the Element Settings window and check the "Required" box. You can also check the "Required" box in the Build Window.
Webforms on a web areas Contact Us pages must allow for anonymous comments. Do not make the name or email address fields on the form required elements. You can make the email address and name required on webforms not on the Contact Us page.
Form Validation
You can create a set of rules to control how the information can be entered in a field, such as limit the amount of characters or words, and add validation to stop spam.

Form Extra Validation
The Form extra validation are rules that span for more than one element. This includes equal components, several components, and the number of times the component be completed for the type of comparison.

Conditionals
Conditionals may be used to hide or show certain components, or entire sections, based on the value of other components.

Advanced
Apply custom styles and attributes to the form element.
Access
Browse and select tokens to customize the form element.
Emails
Add an Email Address to Receive Form Submissions
- You should add one or more email addresses to receive form submissions
- If an email address is not added, the form submission will not be sent, however, it will be available in the form results list
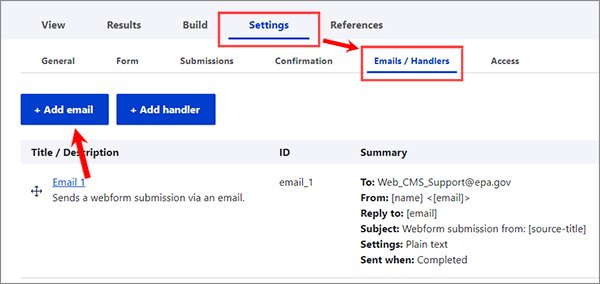
- Go to the Webform window and select the Settings tab, Emails/Handlers, then click the "+Add email" button
Add Email handler
The +Add email button will open the "Add Email handler" properties window.
- The "General Settings, Title" field is for reference only.
- The "Send To, To email" field is for who should receive the emails. Select "Custom to email address," and add the email address in the field. You can add more than one email address separated by commas. Do not choose "drupal_admin@epa.gov" or "Site email address".
- The "From email" field should be set to "drupal_admin@epa.gov" or "Site email address".
- The "From name" field should either be "Name", "Custom from name" or "US EPA".
- The "Reply-to email" field should be "Email Address" from the drop-down list. If left blank, the reply-to will be from drupal-admin.
- The "Message, Body" field should be "Default" - not Custom body with the word "default" in the body field.
- Scroll to the bottom and click Save.

Edit or Remove an Email Address
Under the Settings tab, click "Emails/Handlers" to open the email settings window.
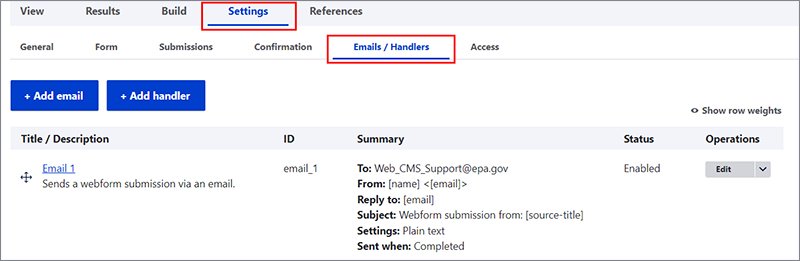
To edit or remove the recipient email address, click "Edit" under the Operations column and scroll to the "Send To" section.

When you have made the change, scroll to the bottom of the properties window and click Save. Once you're back in the email settings window, click "Save Handlers."
Note: any changes made to the form will automatically be public.
Confirmation Message
Under the Settings tab, click "Confirmation," then work with the settings, attributes, URL, and back link properties to customize the message to your needs.

Email the Confirmation Message Automatically to the Submitter
You can set up an automatic reply with a custom message to the submitter who provides their email address. If the submitter does not provide an email address, they will not receive a message via email. Reminder: The Name and Email Address must not be required fields on Contact Us pages. Webforms on Contact Us pages must allow for anonymous comments (see the Web Standard: Contact Us Page). You can make them required on other forms pages.
Build your forms page and the webform components, then under the email/handler settings, click the Add Email button:
- General Settings: Add a title that represents the email type.

- Send To: Select the form element name of the email field.

- Send From (website/domain): Select the form element of the email field, select Custom From Name in the From field, and add your words of choice in the blank field below.

- Reply To (individual/organization): Select Custom Reply-to Email Address and add the form recipients email address in the blank field below.

- Message: Select "Custom Subject" and add text in the blank field below which will appear in the Subject line of the email. In the Body area, select "Custom Body" from the dropdown, and add your confirmation note.

- Set up another email handler and add the email of the recipient when the form is submitted.
- When viewing the Overview page, your Summary should display both the Email to the Form Submitter and the email of the recipient.

Outlook Junk Folder
You can prevent form submissions from ending up in the junk folder by updating the options in Outlook.
This page is not published. To view these guidelines, log into WebCMS (https://www.epa.gov/user).
Help
If your form is sending emails with "default" in the subject or content, you can find instructions on how to fix it here.
This page is not published. To view these guidelines, log into WebCMS (https://www.epa.gov/user).
Attaching Documents to a Form
A user is not permitted to attach documents or files in a webform. Uploading documents from another source can be a security risk. An alternative is to instruct the user to submit documents through an email.
Tokens
Tokens are used to dynamically customize form components, or configure patterns in areas such as the confirmation text. The token list is large and may take a few moments to load when you click on the "Browse available tokens" link.A list of available tokens can be found here

Reviewing the Results of a Webform
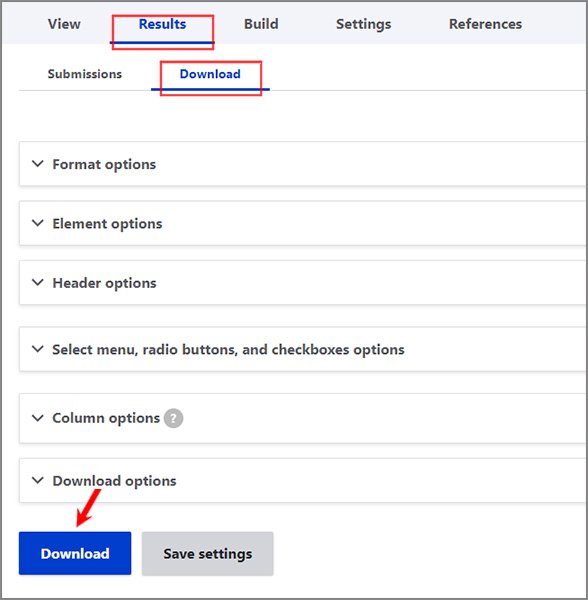
To review the results of a webform--that is, all of the submissions to your form, go to the Results tab. You can download your data in delimited text or Excel format, with the separator of your choice. To do this, click "Download". Webform results older than 180 days will be deleted. Be sure to save them periodically if they matter to you.

Download the Results of a Webform
On the Download tab, several options are available to customize what you want presented in the file.
- Click on the "Download" button to generate a compatible excel file.
- You can select which folder to save your file on your machine.
- If you have a very large number of submissions, you will need to set a limit to a smaller number (no more than 300) and download separate files.
Sending Form Data to Other Databases
Sometimes you'll want to send data to other databases. We have two options for that.
- You can create your own form, HTML and all, in a basic page. You will have to do your own validation, your own thank you page, your own results tabulation.
- You must have an exemption to send this data elsewhere: Ensuring EPA Public Content in the EPA Web Environment.
- Or, you can use Webform Remote Post: a module that works by POSTing form submissions to any arbitrary URL, such as an application or script that will use the form data and perform further processing of that data. Webforms built using Remote Post will act just like a normal webform; in addition, all validation rules are respected, and only submissions that passed validation and are no longer in a draft state are sent. Multiple remote posts can be setup for each individual form, allowing for the submission of data to multiple systems at once.
- Data will be stored in both the database of the WebCMS and in the remote database.
Contact WebCMS Support (web_cms_support@epa.gov) if you have a need to send data to a remote form.
Use Cases
- CRM Integration – If you have a CRM like Salesforce, you can use this module to push submissions using the web-to-lead mechanism to create a Lead from every Webform submission. Form submissions are saved in the WebCMS database and at the remote database.
- Re-posting to any 3rd party system – This module is general purpose. You need the form data to be immediately submitted to another system automatically? Add a remote post target to it!
Example use of Remote Post: Salesforce
Salesforce ordinarily provides the entire HTML markup you need to display the form on the page. Convert that HTML to the native Webform builder by taking the Salesforce generated markup name attribute and copying it into the WebCMS webform "Field Key." You will also need to take the hidden values from the Salesforce generated HTML.
You can see an example of the copied values by looking at the HTML source of the Contact Us about LMOP form, which uses Remote Post to send to Salesforce.
The "Title" field has its "Field Key" set to 00NG0000008gwdb, and the id of the field in the HTML source is edit-submitted-00ng0000008gwdb. There are also hidden fields: orgid, retURL, external. These values are used by Salesforce to identify where the data is coming from and which form it belongs to.